Tuesday, May 14, 2024

Die cut flower cluster


I thought I would try a different layout for this card, it fits inside a business size envelope. Instead of having the classic fold in half I made the front only half the size of the back, so that you can see the happy birthday die cut while the card is closed. The Happy Birthday is cut 3 times and layered together for some dimension. 


Inside I have used the Flower Pivot Panels for a surprise element once you open the card.


On the front of the card I have used several die cut flowers

Supplies 
Karen Burniston dies 1160 Flower Pivot Panel
MFT fancy Flourish and flower dies.


Thursday, May 9, 2024

Center Tower Gate fold


This card was inspired by a Sam Calcott tutorial. It is called the Centre Tower Gatefold Card.


The card measures 7 x 5, I chose this size so that I could add the sentiment panel from the paper pack.


It looks great on display, however I still had trouble popping out that tower, even after adding a acetate strip in the back. The card was easy to make, I may try it again but in a smaller size.


Monday, April 29, 2024

Triple fold die.


A friend gave me this die set, I had to make this card straight away. I had this image already coloured in my stash. The card is on the small side for a triple fold card, it easily fits in to a c5 envelope.


 Thanks for looking.

Sunday, April 28, 2024

Celebrating a Baby boy

I made this card recently for the arrival of my grandson. 
I went stash diving for all of the supplies. I really liked the designer paper and wanted to showcase it so I have just put a few small embellishments on the front.


One the inside I made a pop up platform for all the baby images. I stamped and coloured all the babies and cut them to fit into one inch squares. 


Thanks for looking.


Wednesday, April 3, 2024

Spanner panel card


Card base size, 81/2" x 51/2"{-fold in half to make card base card size 41/4" x 51/2"
Fold the card base in half, along the 51/2" side cut 11/2", width from each end up to the fold line. The front panel will have 3 pieces. and the back will have one. Make matt and layers for decoration. Before adhering, the side matts attach a piece of acetate to the front side panel, to make a bridge that goes over the middle panel.


When the card opens there will be a layer that opens with the two panels on each end joined with the acetate, I have decorated these with the under the sea elements.
The next panel is decorated, and the sentiment is place so that it can be seen when the card is closed.


On the inside of the card make a matt that fits perfectly under the card front and decorate with matt layers that match the card front. A stamped sentiment and a place for you handwritten message will appear inside.


Tuesday, April 2, 2024

Gift Pivot Panels

This is one of my favourite quick cards.


I have used the Gift Pivot Panels die from Karen Burniston Designs for the inside and the gift embellishments. I pulled out an older fish tail banner di for the front of the card.


Hope you are having a good day and thanks for looking.


Wednesday, March 20, 2024

Butterfly wave card


This is another Stadium wave card; they are so much fun to make. You can see the original post from last month.  Here.


 Measurements
Card base 11 x 4 1/4 inches, fold in half and score at 5 1/4" from each end. This will make a 1/4 section in the middle that makes it look like a book cover, allowing space for the wave part to expand. Make matt layers for the front and 2 inside panels. 

wave measurements
Used heavy weight designer paper or light card stock to make the wave element.
6 x 7 3/4 inches

 along 7 3/4" side score at 3, 3 3/4, 4 1/2, 7 1/2 then on the 6" side cut into 6, 1" strips.

reinforce the score lines, fold and glue the top 1/4" so that you have what looks like a W. Glue the 6 pieces together, overlapping each piece by 1/2" so that it looks like a wave.

Make the card base and attach the wave pieces into the center, of the card so that it cannot be seen outside the folded card.

I attached the butterflies, so that they appear to be in flight as the card is opened.

Make a belly band to size by folding a piece of card around the base card so that it slips off easily. Decorate as you wish.


Have fun creating and thanks for looking.

Tuesday, March 5, 2024

Pop up gate fold keys

This is another version of the pop-up gatefold card. This time the front panel is a larger so that I could fit in the die sentiment.


 FRONT:
Base card: 5 1/2" x 8”
Front panel 4" x 3 1/4"
Gold foil 3 3/4" x 3" 
Designer Paper 3 1/2" x 2 3/4"
Gold Foil 1 7/8" x 5 3/8", cut 2
Gold foil 1 1/8" x 1 7/8", cut 4
Designer Paper: 1 7/8” x 5 3/8, cut 2
Designer Paper 1 1/8” x 1 7/8”, cut 4
Happy Birthday Die

Tuesday, February 20, 2024

Crabby Wishes

I made this card for my Granddaughter who has turned 2 this month. When she visited last time, we took her to an aquarium and she enjoyed the SeaLife, especially feeding the turtles.


I created an under the sea theme for the inside of the card. Using the mini pops pop-up die to make the pop-up part of the card I then die cut the wavy edges to look like water and added the sea life.


 Supplies
Sentiment Stampendous
Karen Burniston 1068 Ocean Animals, 1037 Sea Animals, 1036 Princess and Mermaid, 985 Rocky the Crab, 1180 Big Birthday Charms, 1146 mini Pops pop-up
Lawn Fawn Wavy edges

Thanks for looking.


Tuesday, February 13, 2024

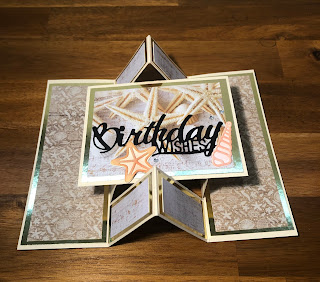
Pop up gate fold shells

This is another version of the pop-up gatefold card. This time the front panel is a larger so that I could fit in the die sentiment and added die cuts.

 FRONT:
Base card: 5 1/2" x 8”
Front panel 4" x 3 1/4"
Gold foil 3 3/4" x 3" 
Designer Paper 3 1/2" x 2 3/4"
Gold Foil 1 7/8" x 5 3/8", cut 2
Gold foil 1 1/8" x 1 7/8", cut 4
Designer Paper: 1 7/8” x 5 3/8, cut 2
Designer Paper 1 1/8” x 1 7/8”, cut 4
Happy Birthday Die, shells and gems


Thanks for looking